We occasionally link to goods offered by vendors to help the reader find relevant products. Some of these may be affiliate based, meaning we earn small commissions (at no additional cost to you) if items are purchased. Here is more about what we do.
Gimme ALL the gimmicks – I heart Valentine’s Day!

I admire the eager soul who fully commits and goes all out to pursue a theme.
And I’m not just talking about holidays here.
For example, it’s been a wild pleasure sitting here in one of the rooms of my new townhouse, surrounded by four maroon walls, each painted top to bottom with a colorful Dr. Seuss mural. The previous owner of the house painted everything by hand, even painting the outlets. She took her chosen theme and ran with it.
No – she sprinted, galloped, flew with it!
There’s Thing 1 and Thing 2 on one wall, Horton holding a flower on another wall, Sam I Am and his friend eating green eggs and ham on the third, and a quote from Dr. Seuss on the last:
“Why fit in when you were born to stand out?”
Dr. Seuss, how you make me smile!
Though there is a strong debate as to whether or not to paint over these adorably garish murals (how long can I really stare into the faces of Thing 1 and Thing 2 without going just a little crazy myself?), I can at least respect the overall concept behind the images before I cover them in three coats of primer:
Pursue happiness, love, and joy to the highest level. No holding back, no second guesses.
And so here we are, with Valentine’s Day on the way. Rather than simply buying a bag of chocolates to give to your love, why not push past the limits of your own comfort level?
Take a little advice from Dr. Seuss: stand out this year, instead of fitting in with the rest of the candy-and-card-buying crowd.
Go. All. Out.
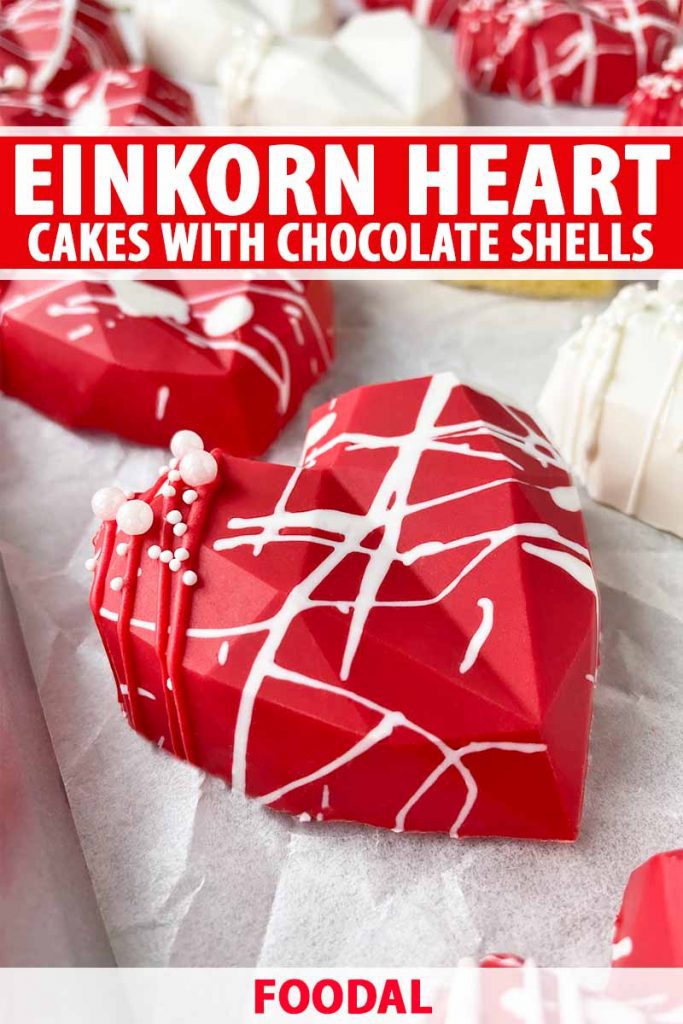
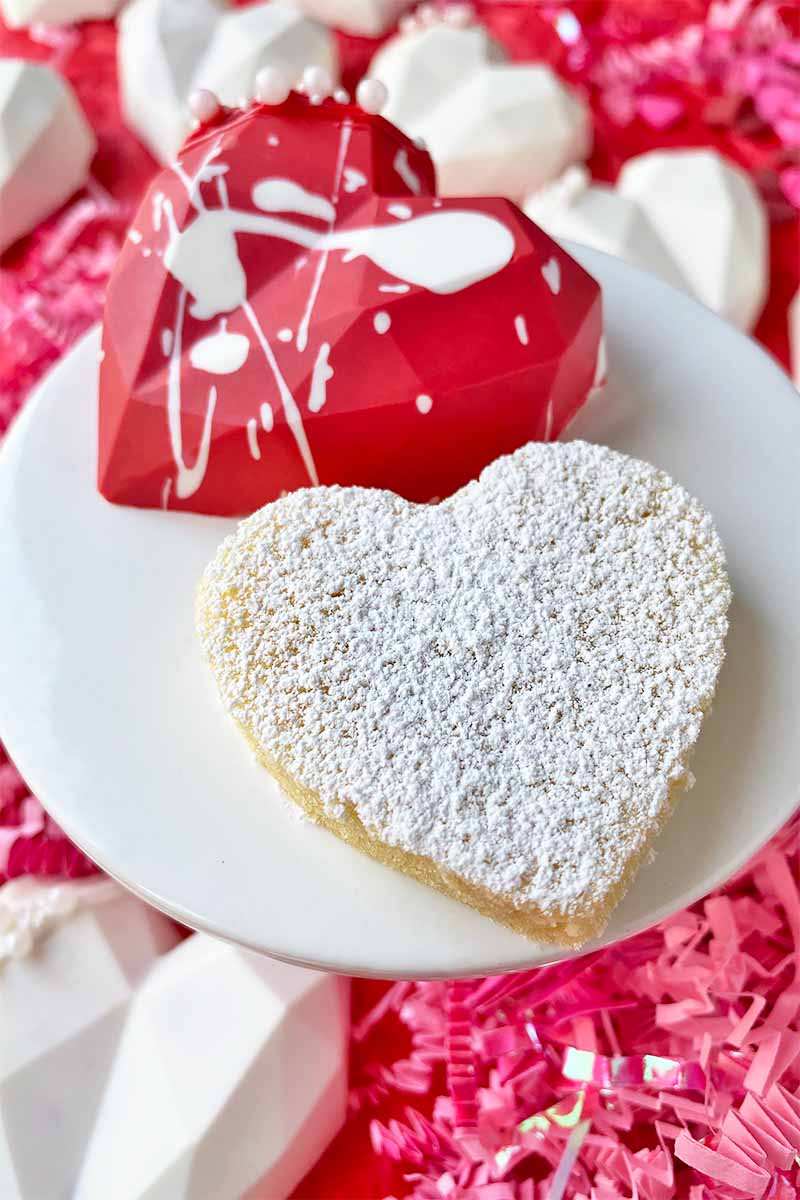
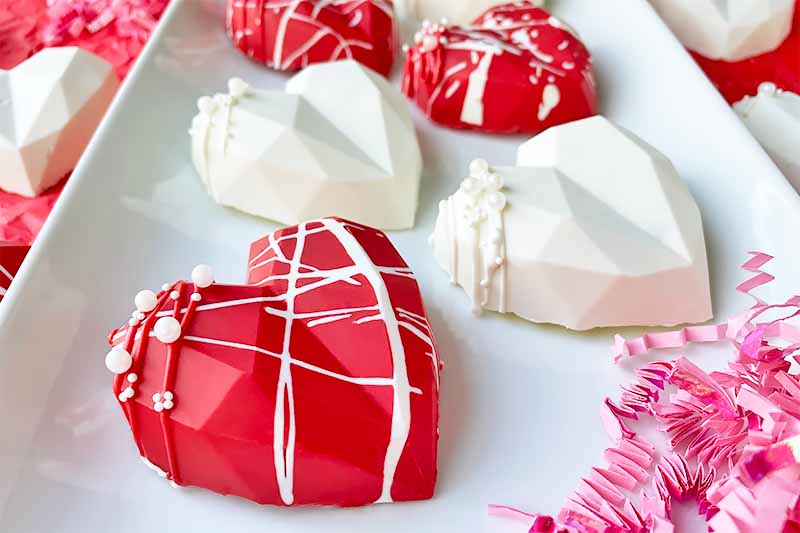
Try something new, homemade, and fully customizable: my mini einkorn flour heart cakes, served as a sweet surprise beneath beautiful candy heart shells.
It’s the perfect gift for Valentine’s Day – and it’s completely edible, shell and all!
Don’t be daunted by the chocolate shells! Because I use some of the same methods for my homemade cake pops, they’re actually very easy to make with store bought candy melts and a silicone mold.
Silicone molds are useful for not just baking sheets, but also for sweets! With a seemingly endless selection of mold shapes, you can choose whatever you like. I had a lot of fun using diamond heart-shaped molds for these photos, available on Amazon.
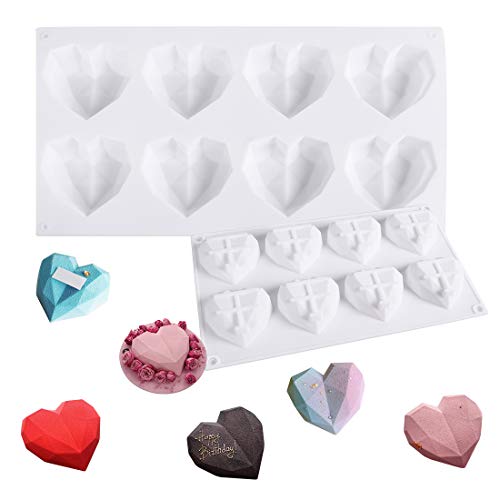
Silicone Heart Diamond Shaped Cake Mold (8 cavities), available on Amazon
Once you test a few hearts, you’ll develop a confident rhythm as you become more familiar with the process, maybe even adding some extra flair like paint splatter designs when that confidence level reaches a creative high.
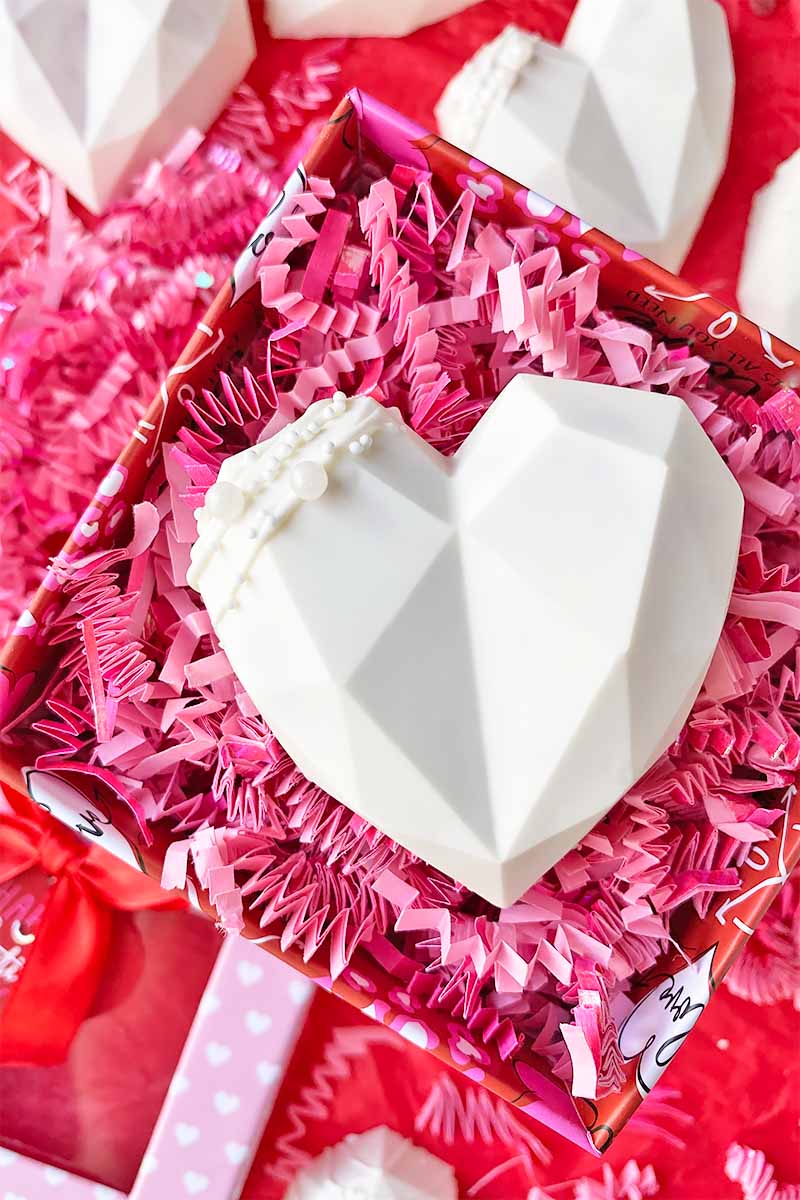
Use your favorite colors, and have fun with the decorations on top. There are plenty of edible sprinkles, sparkles, and shine available online or at your local craft supply store. You can also find a variety of disposable small plates or boxes, a perfect way to transport these treats to share with your friends and family.
You can also use desserts other than cake as the surprise inside. Try any of our einkorn cookies, like chocolate chip or thin and chewy spice cookies.
Ready to stand out this Valentine’s Day? Take the time to make something special and unique for the ones that are special and unique in your life!
Print
Valentine’s Einkorn Heart Cakes with Chocolate Shells
- Total Time: 2 hours, 30 minutes
- Yield: 24 cakes 1x
Description
Want to stand out on Valentine’s Day with a unique dessert? Make einkorn heart cakes with a chocolate shell as a pretty and totally edible gift.
Ingredients
For the Cake:
- Nonstick cooking oil spray
- 1/2 cup granulated sugar
- 3/4 stick unsalted butter, softened
- 2 large eggs
- 1 1/3 cups all-purpose einkorn flour
- 1 1/2 teaspoons baking powder
- 1/2 teaspoon salt
- 1/2 cup whole milk
- 1/4 cup full-fat Greek yogurt
- 1 teaspoon vanilla extract
For the Chocolate Shell and Assembly:
- 3 12-ounce bags chocolate candy coating wafers
- 2 teaspoons vegetable shortening, room temperature, as needed
- Assorted sprinkles (optional)
- 1/2 cup powdered sugar, for dusting
Instructions
For the Cake:
- Preheat the oven to 350°F. Line a quarter-size rimmed baking sheet with parchment paper and spray the bottom and sides with nonstick cooking spray. Set aside.
- In a stand mixer fitted with the paddle attachment, cream together the granulated sugar and softened butter at high speed until light and fluffy, about 5 minutes. Add the eggs one at a time on medium speed until completely incorporated, scraping the sides of the bowl as needed between additions.
- In a medium bowl, sift together the einkorn flour and baking powder. Add the salt. In a separate small bowl, whisk together the milk, yogurt, and vanilla.
- On low speed, add the flour mixture alternately with the milk mixture to the creamed butter and sugar, starting and ending with the flour. Mix just until completely incorporated, scraping the bowl after each addition.
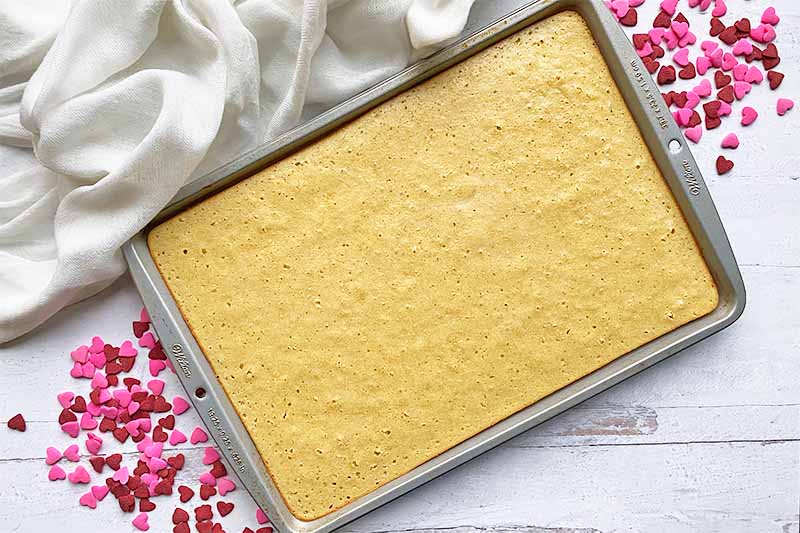
- Pour the batter into the prepared baking sheet. Bake for 18-20 minutes, until the cake springs back when gently pressed. Remove from the oven and set aside to cool completely.
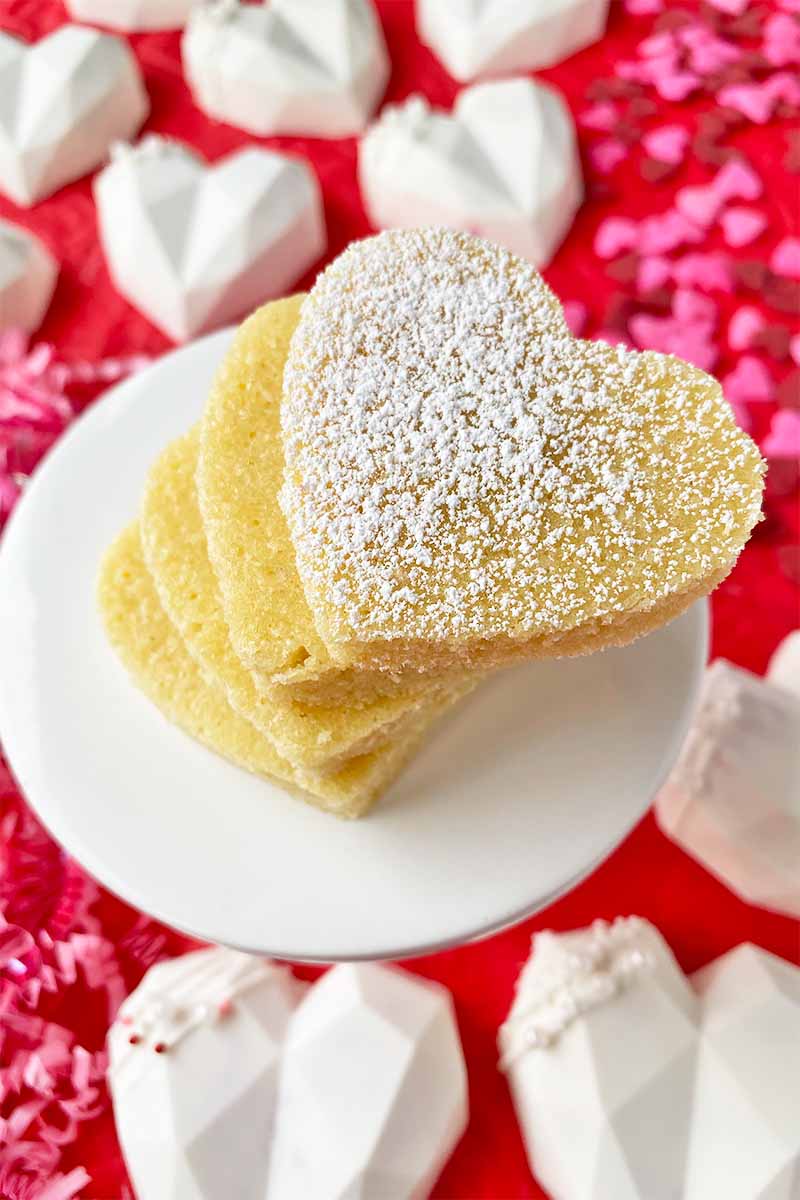
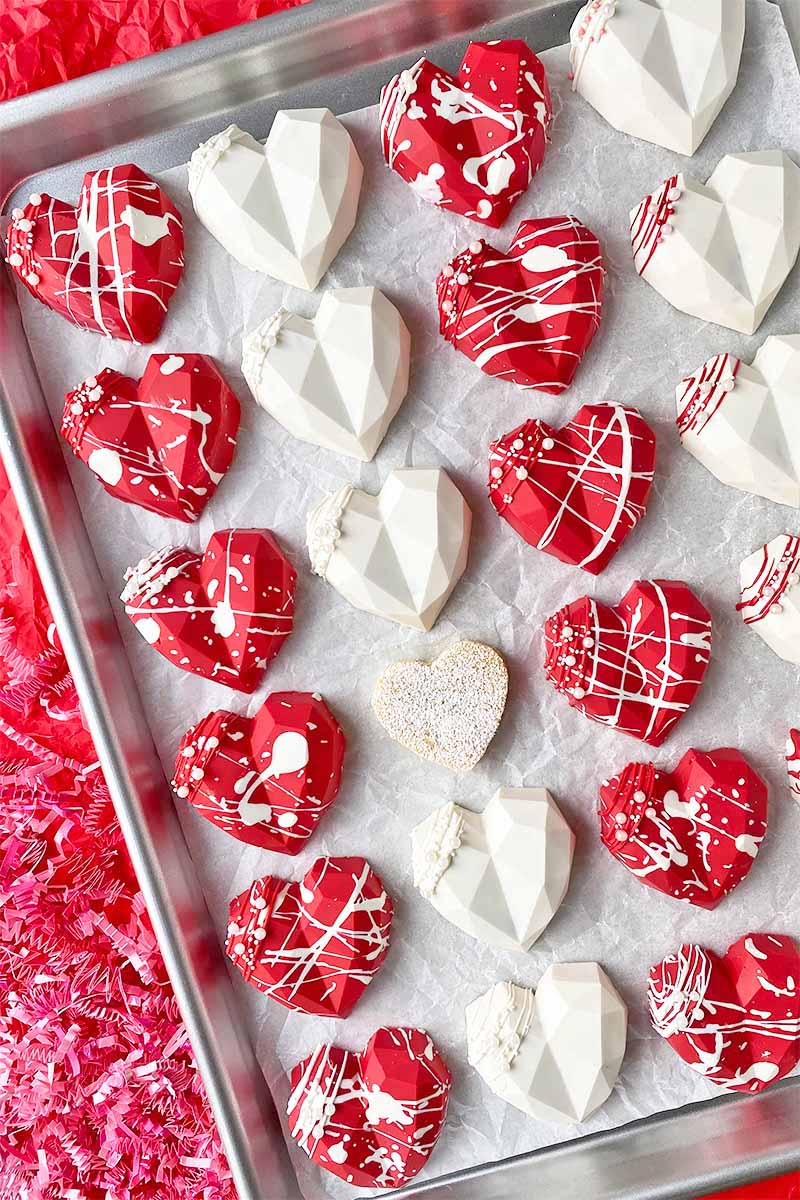
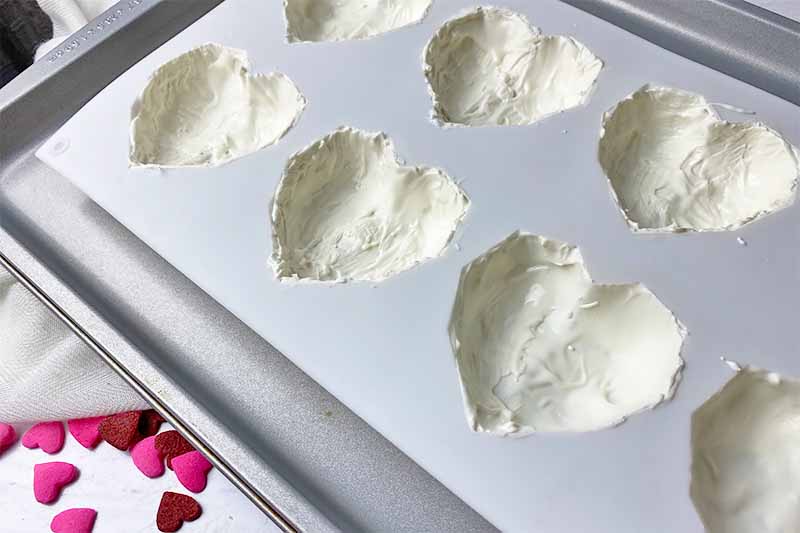
- Once cooled, cut the cake into 24 hearts using a 2-inch heart-shaped cookie cutter. Arrange on a half baking sheet in a single layer without overlapping, cover tightly with plastic wrap, and set aside until ready to decorate.
For the Chocolate Shell:
- Place a silicone mold with 8 2.5-inch heart-shaped sections on a flat plate.
- Place one cup of chocolate candy coating wafers in a heatproof bowl. Melt completely in 10-second intervals in the microwave, stirring between each. If the melted candy/chocolate is too thick to spread easily, stir in 1/4 teaspoon of vegetable shortening.
- With a spoon, place about two teaspoons of melted chocolate coating in one of the heart-shaped molds. With a small brush or small spoon, spread to cover the inside of the mold. Repeat with the other seven sections. Transfer to the refrigerator to chill for 10 minutes, until completely hardened.
- Once hardened, remove from the refrigerator and apply a second coating of melted chocolate to each cavity in the mold, making sure to cover any missed holes or thin spots. If the chocolate coating is hardening, return to the microwave and heat in 10-second intervals, stirring between each, until melted. The shell should be about 1/8 inch thick. Transfer to the refrigerator to chill for another 10 minutes, until completely hardened.
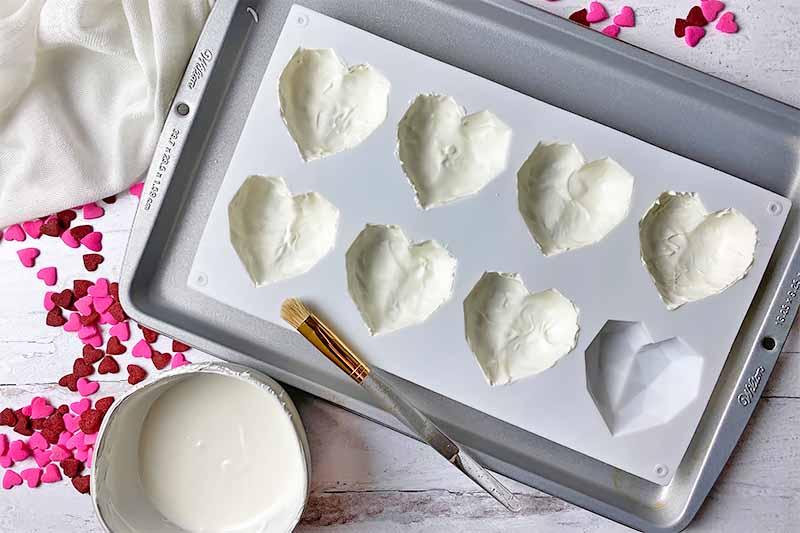
- To remove the shells from the mold, carefully loosen all of the edges of one heart-shaped section. Starting from one end, carefully peel back the mold, holding the chocolate shell as you’re peeling, until the entire shell is removed. Repeat with the rest.
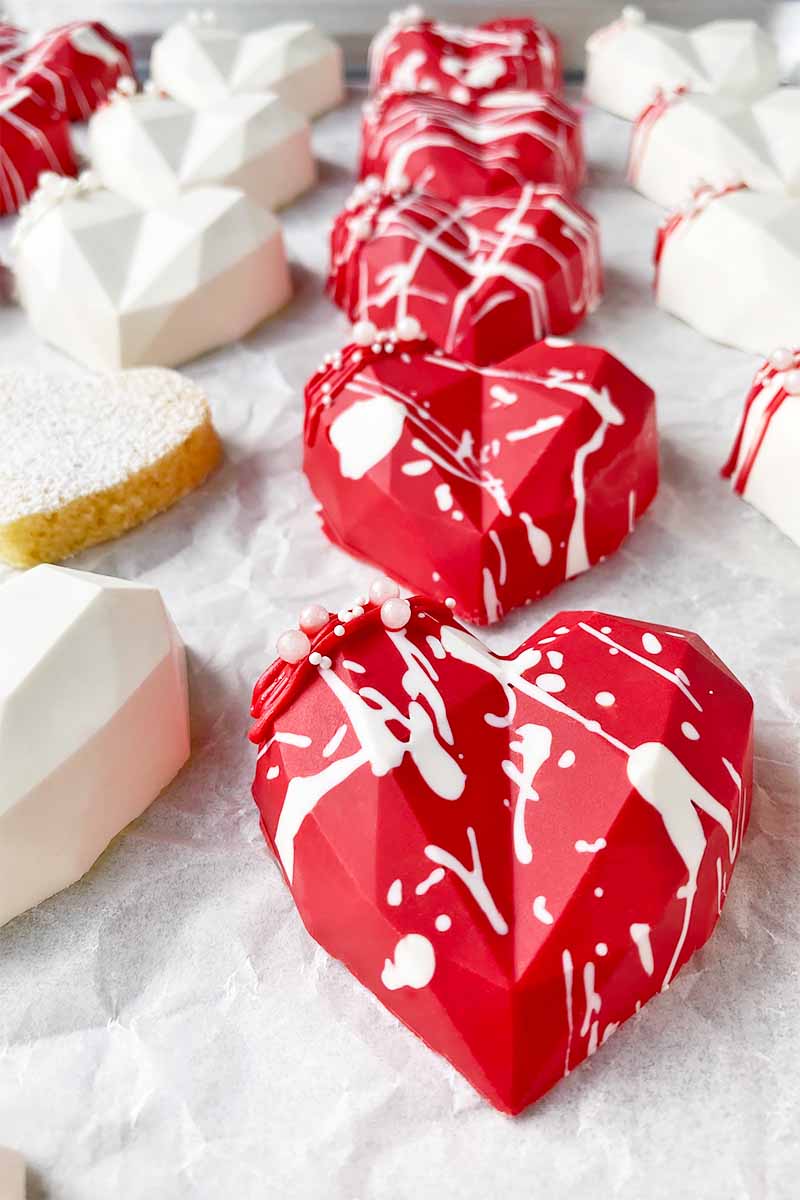
- Clean off any excess chocolate with your fingers or a small offset spatula. Transfer to a half sheet pan lined with parchment paper and place in the refrigerator until you are ready to decorate.
To Decorate and Assemble:
- To add sprinkles, drizzle any remaining melted chocolate coating on top of the exterior of each shell and quickly apply sprinkles before it sets. You may need to remelt the chocolate coating in 10-second intervals in the microwave.
- Transfer to the refrigerator to chill for 10 minutes, until completely hardened.
- When ready to assemble, lightly dust each piece of cake with powdered sugar. Place each cake on a small plate, and carefully place a chocolate shell on top. Serve, and enjoy!
- Prep Time: 30 minutes
- Cook Time: 30 minutes
- Category: Cake
- Method: Baking/Microwave
- Cuisine: Dessert
Keywords: Valentine's Day, cake, einkorn flour, heart, chocolate
Cooking by the Numbers…
Step 1 – Bake the Cake
In order to create flat and even hearts, a baking sheet – rather than a round cake pan – is best for this step.
Preheat the oven to 350°F. Line a quarter-size rimmed baking sheet with parchment paper and spray the bottom and sides with nonstick cooking spray. Set aside.
Make sure your baking sheet is rimmed. You’ll need those walls so the batter doesn’t spill!
Prepare the batter, using a stand mixer or hand mixer to combine the ingredients. Pour the batter into the prepared baking sheet.
Bake for 18-20 minutes, until the cake springs back slightly after you gently press down on it. Remove from the oven and set aside to cool completely in the pan.
Step 2 – Cut into Heart-Shaped Pieces
Once the cake has completely cooled, keep it in the baking sheet as you cut out 24 hearts using a 2-inch heart-shaped cookie cutter. Place the pieces in a single layer on a half sheet pan, cover tightly with plastic wrap, and set aside until you’re ready to decorate.
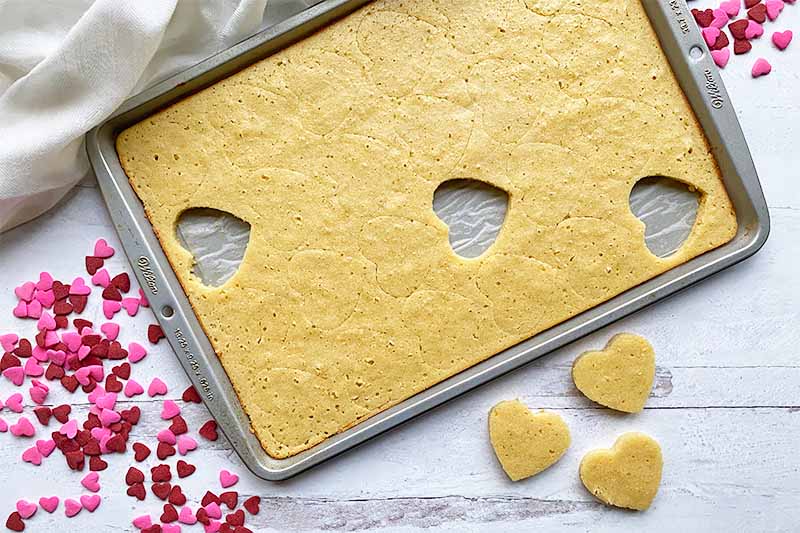
You don’t want to go any bigger than a 2-inch cookie cutter, or else the pieces will be too big to fit underneath the candy/chocolate shells.
Step 3 – Melt the Candy Coating
Place a silicone mold with 8 2.5-inch heart-shaped sections on a flat plate.
Working with one cup of candy melt wafers at a time, melt the wafers in a small microwave-safe bowl. Microwave in 10-second intervals until completely melted, stirring thoroughly after each interval. This will take about 30 seconds total.
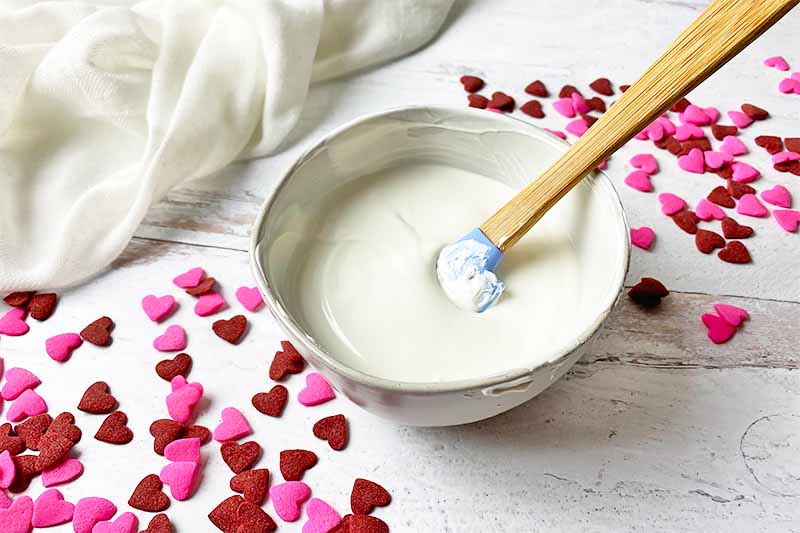
If you think the melted candies are too thick to spread into the molds, there is an easy solution! Mix in 1/4 teaspoon of shortening per cup of candy melts to loosen the mixture.
Just make sure the shortening is completely melted! Here is what I do: add the shortening, stir, microwave again for 10 seconds, and stir again to evenly distribute the melted shortening.
Step 4 – Apply the First Layer in the Mold
Optional Decoration: Want to add a paint splatter effect to your treats? Before applying the first layer, quickly shake a spoon dipped in melted wafers of a different color over each mold. Cool the splattered decoration in the refrigerator for 10 minutes before applying the first base layer.
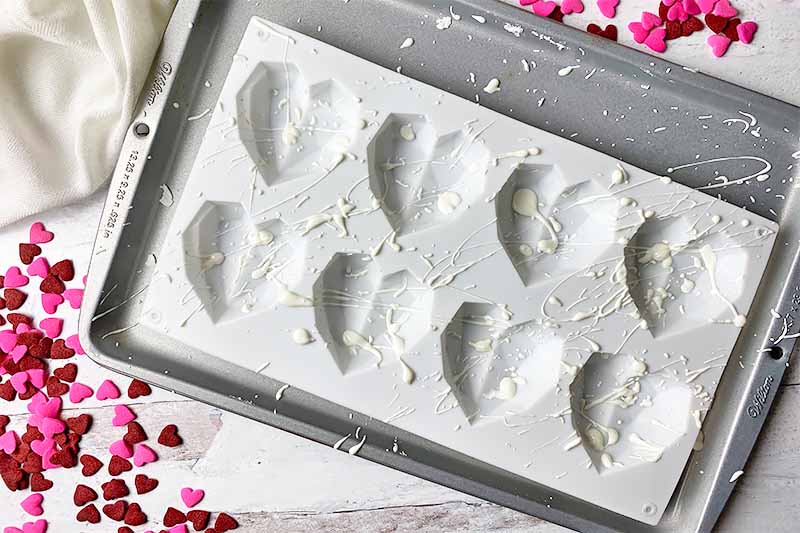
With a small spoon, pour about two teaspoons of the melted wafers into one section of the mold. Using a small brush or small spoon, spread the melted chocolate evenly to cover the entire surface, using a little more melted candy wafers if needed.
This is the base layer of the decorative shells, so you want to ensure that the candy coating covers the entire mold in a thin, even layer. But you don’t want the melted wafers to go on too thin – if you see the silicone mold peeking through the chocolate, apply a little more.
Repeat with the other sections.
Clean off any excess chocolate with an offset spatula or butter knife. Transfer to the refrigerator and let cool until completely hardened, about 10 minutes.
Step 5 – Apply the Second Layer in the Molds
Once the base layer is hardened completely, apply a second thin layer of melted wafers on top, making sure you cover any spots you may have missed, or spots that look a little thin. In the end, you want the candy coating in each mold to be about 1/8 inch thick.
Chocolate getting hard? Reheat it in the microwave in 10-second intervals until it is melted again, stirring between each.
Apply a second layer to the remaining molds. Return to the refrigerator to cool until completely hardened, about another 10 minutes.
Step 6 – Remove from the Molds
Line a half sheet pan with parchment paper.
Once the chocolate is completely hardened, carefully remove the decorative shells from the molds.
Wait, take your time!
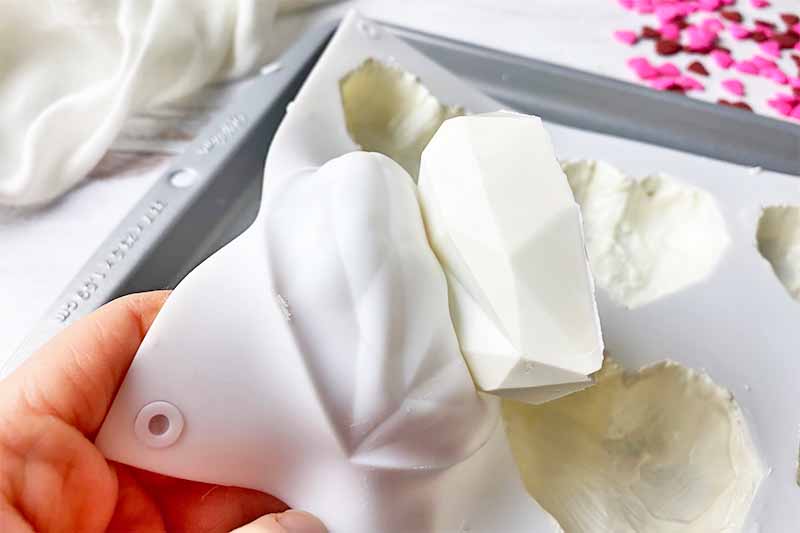
Let the silicone mold’s malleability work in your favor to release each shell. Make sure you start by loosening the entire edge around the mold first, before starting at one end to slowly remove the shell.
Carefully clean off any excess chocolate on the base with your fingers or a small offset spatula. Store in the refrigerator on the lined sheet pan until ready to decorate.
Phew! Done!
Well, kind of…
Repeat Steps 3-6 to prepare the remaining candy shells. For 24 total shells, you’ll need to repeat this a total of 3 times with a silicone mold that has 8 shaped sections.
Step 7 – Apply Decorations (Optional)
While you can definitely use the shells plain, I love adding even more dimension and character with extra decorations!
Use a little more melted candy to drizzle on top of each covering, and quickly apply sprinkles before it sets. The drizzle will set quickly, since you’re applying it to a cold shell – so work fast!
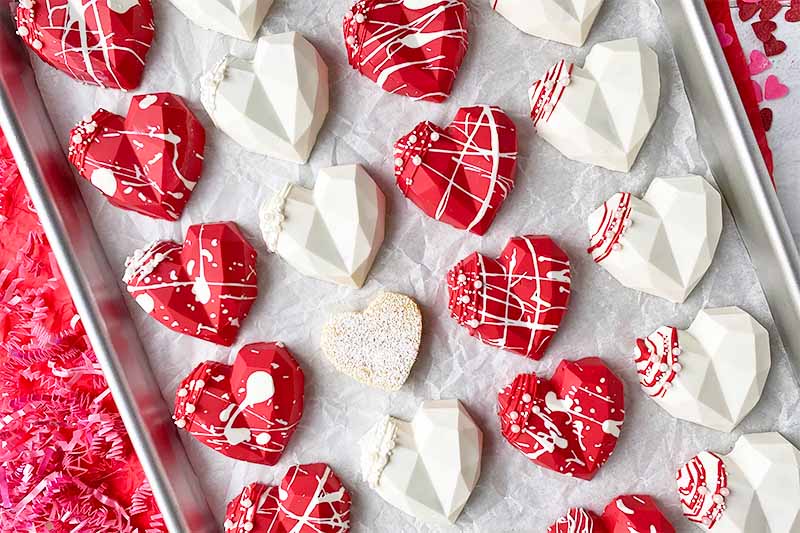
This is the best opportunity to use up any remaining melted chocolate from the previous steps. But if you don’t have any left over, you can melt an additional 1/4 cup of wafers in the microwave.
When you’re finished, place back in the refrigerator for 10 minutes to completely harden the additional decorations.
Step 8 – Assemble and Serve
Before serving, lightly dust each cake piece with powdered sugar. Place one piece on a small plate. Gently place one of the shells over the cake.
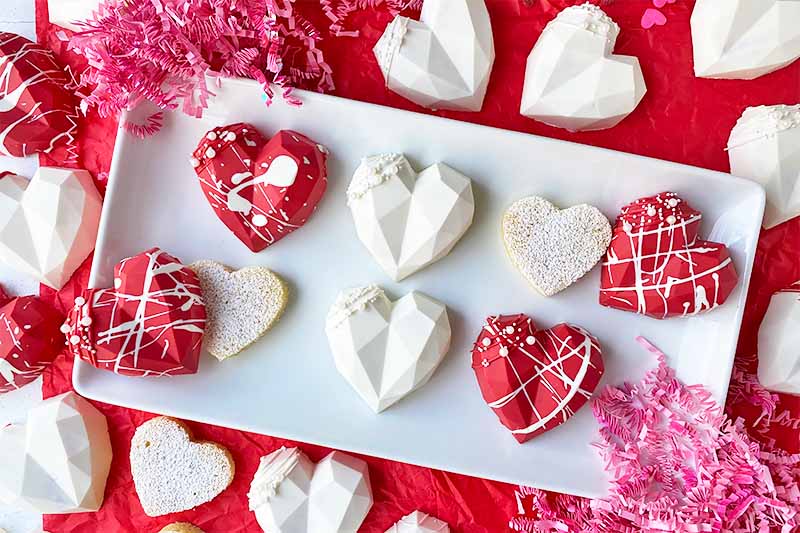
Serve to your sweetie, and watch in delight as they remove the beautiful shell to see a cute little cake underneath!
Speaking of Cake Pops…
You’ll love the versatility of having a silicone mold with a fun shape on hand!
You can use it to make a variety of sweets and treats that will bring a smile to anyone’s face. Here are a few suggestions:
Cake Pops
After chilling the first layer of melted wafers, gently press prepared cake pop filling inside until it is flush with the top of the mold. Spread a thin layer of more melted wafers on top of the cake pop. Chill for 30 minutes, or until firm.
Healthy Snacks
After making the mixture for recipes like our no-bake chocolate energy balls or our peanut butter and jelly balls, press a few spoonfuls into the molds. Chill for 30 minutes, or until firm.
Bountiful Batters
Most silicone molds are safe to use in the oven up to 500°F, so you can bake any of your favorite cake or brownie batters directly in the mold.
Will you take on the challenge of preparing a homemade dessert this Valentine’s Day? What do you think you’ll create?
If you decide to try this recipe, I’ll be thrilled! And I’m here to help – if you have any questions, leave a comment below.
For more Valentine’s Day inspiration, these recipes will be sure to tickle you pink:
- Royal Icing Valentine’s Day Cookies
- Chocolate Strawberry Smoothie
- Chocolate-Dipped Strawberry Milkshake
Photos by Nikki Cervone, © Ask the Experts, LLC. ALL RIGHTS RESERVED. See our TOS for more details. Originally published by Shanna Mallon on February 9, 2015. Last updated on January 13, 2021.
Nutritional information derived from a database of known generic and branded foods and ingredients and was not compiled by a registered dietitian or submitted for lab testing. It should be viewed as an approximation.
About Nikki Cervone
Nikki Cervone is an ACS Certified Cheese Professional and cheesemonger living in Pittsburgh. Nikki holds an AAS in baking/pastry from Westmoreland County Community College, a BA in Communications from Duquesne University, and an MLA in Gastronomy from Boston University. When she's not nibbling on her favorite cheeses or testing a batch of cupcakes, Nikki enjoys a healthy dose of yoga, wine, hiking, singing in the shower, and chocolate. Lots of chocolate.
Lovely.
Oh wow!! These are so pretty!!
This is darling! 🙂
these look delicious!
This post is so sweet. I love hearts of all kinds, no matter what time of year, and these little heart cakes are just adorable.
These are too lovely. I know it’s mushy and silly and a bit ridiculous for a grown woman but I can’t help wanting to make everything heart-shaped at this time of year 😉
Girl after my own heart! You know you’re among friends here. : )
This is perfect for that special day!
Thanks, Tracy!
These are so pretty and look super yummy! I need some homemade chocolate shell in my life.