
After three attempts, two days, and one satisfying result, I can honestly say I know something today that I didn’t know a week ago.
Well, make that, I know a lot of somethings, and they all have to do with one thing. The kind of thing that’s no small feat, especially when you’re a slow learner (hand raised!) and prone to catastrophe (why yes, that was me that put wax paper in the oven on attempt #1…).
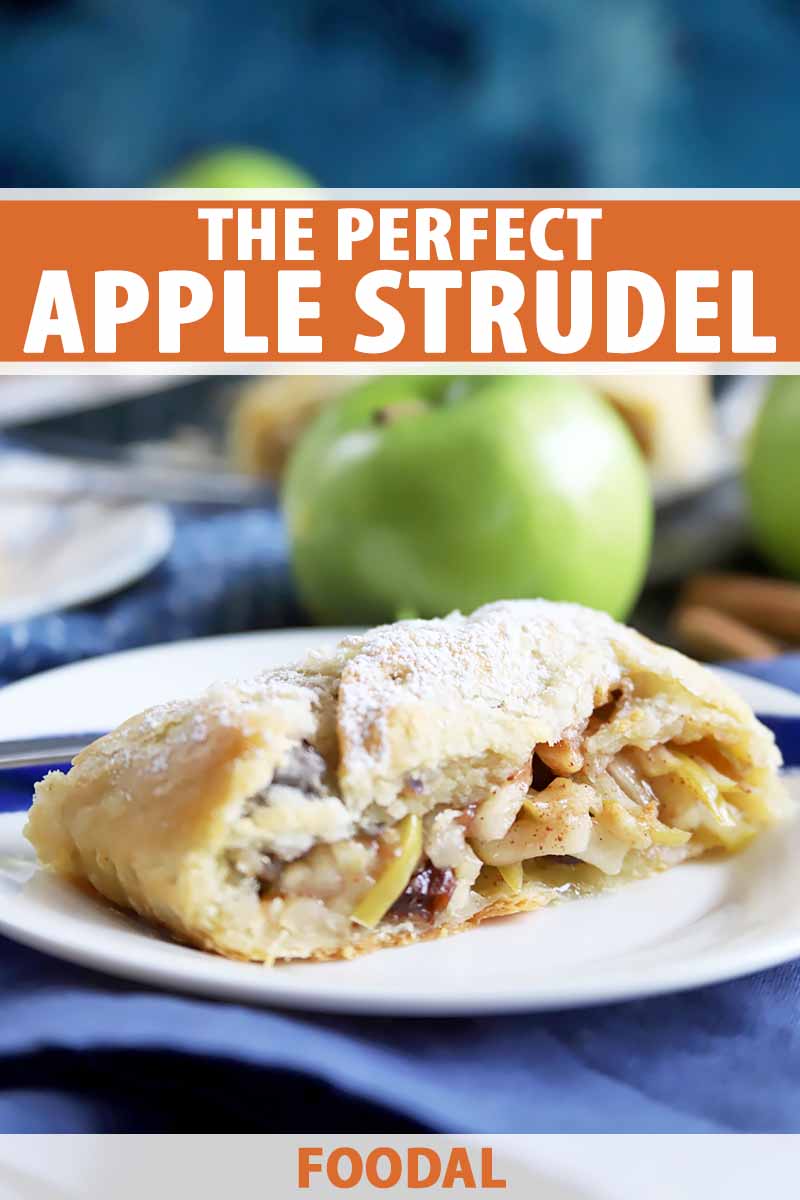
It’s time to celebrate, because I now know how to make the perfect apple strudel.
There are bigger accomplishments to be made in life than this, I know. But there are few I’d be more happy about, and few I’d be more excited to share with you.
So, here is the story:
You could say things began last Saturday, at an evening wedding on the lake, where all the tables in a big white tent in Michigan were topped by gorgeous, green apples and a certain beautiful bride insisted we take a whole basket home with us.
She’s always generous like that (have you read her blog?), and with our arms full while we walked to the car, we brainstormed about what to do with them.
But you could say this story starts even earlier than that, decades earlier in fact, in a small Maywood kitchen where my grandma liked to bake, and in the house I grew up in, where my mom liked to recreate her recipes.
I found the original version of this strudel, one carefully recorded in Grandma’s handwriting, one in Mom’s, tucked into an overflowing cookbook. Do you have one of these, the kind of book you have to hold carefully, or papers start falling out?
Although there were many (crucial! important! why-don’t-you-guys-write-this-stuff-down-type) instructions missing, my third attempt at following it was a charm, particularly when I enlisted my mom’s trained eye for help.
I discovered a few secrets along the way, and I’d like to share these with you now:
Secret #1: With Apple Strudel, It’s All About Technique
There are many things you can fudge on: slice the apples or dice the apples, add nuts and raisins to the filling or leave them out, make one strudel or make them two at a time (the way the women in my family liked to).
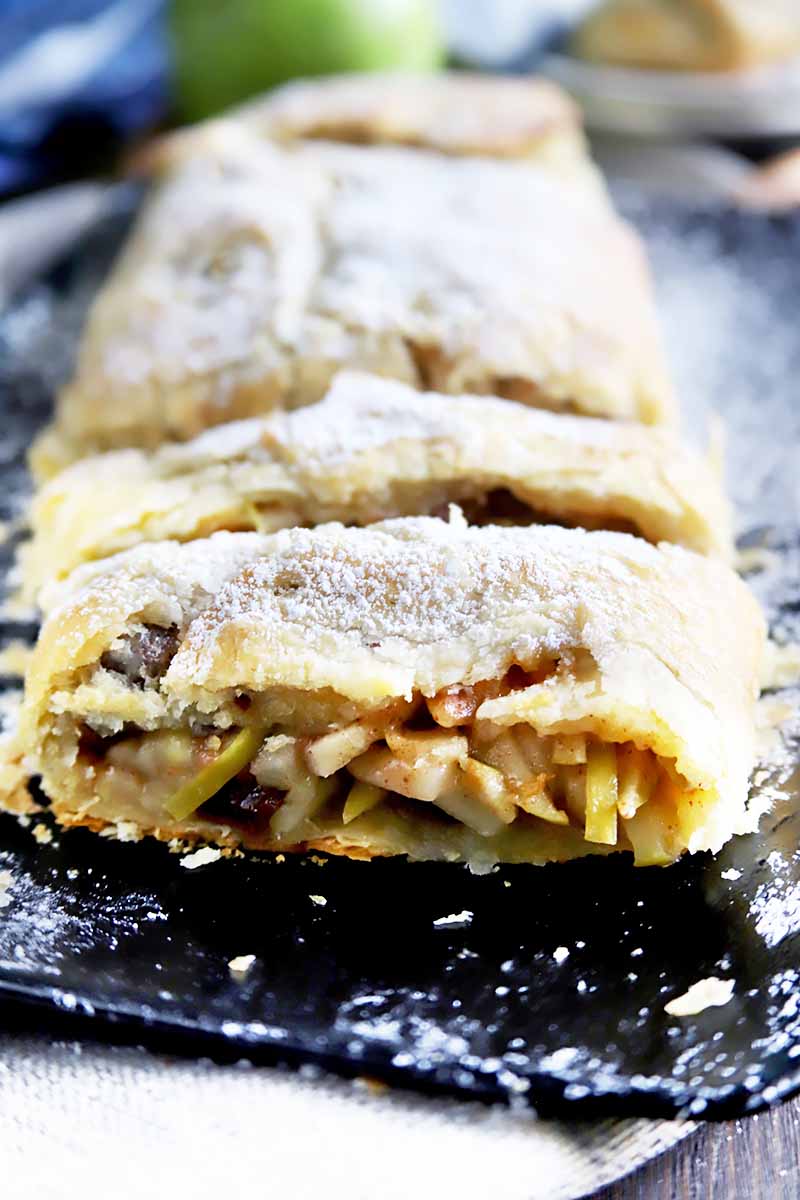
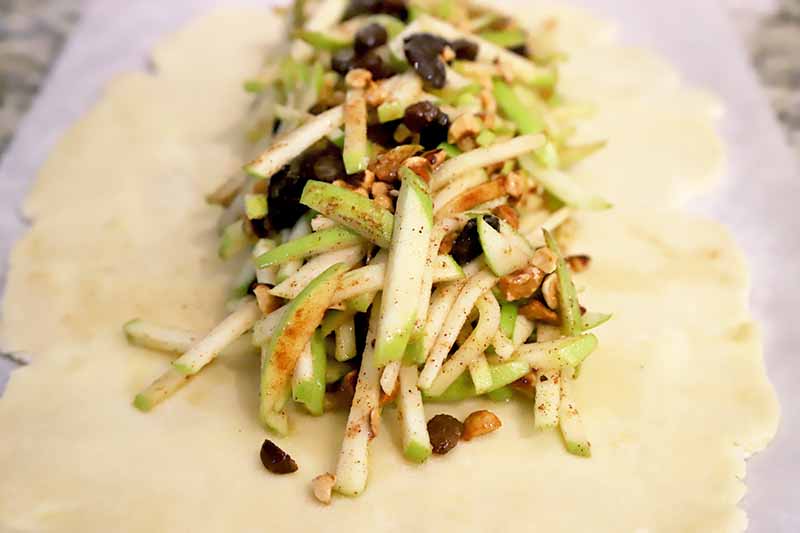
But one thing you can’t alter is the way you roll out the dough, and spread the filling in a compact, uniform mountain right in the center.
It should be high and even, and just in the center of the dough. This is key.
Secret #2: You Don’t Have to Chill the Dough
To me, discovering this was mind-blowing.
I mean, the original instructions insist you have to refrigerate the dough, wrapped in wax paper, for eight hours or overnight.
But nonetheless, my Mom has never done this, and I’m guessing Grandma didn’t either.
I could launch into a long aside here about how home cooks really should write their recipes down accurately, with useful notations. This would be so helpful for posterity, or for struggling granddaughters at the very least! But I already whined about this to my mom and at least once already in this article, so I’ll just assume you all know this already and we’ll move on.
If your kitchen is particularly hot, feel free to chill the dough. But learn from my experience and the details (eventually, when I realized which questions I needed to ask) passed down to me, and know that you don’t have to.
Secret #3: You Control the Dough
I could have called this one “Use Lots of Flour” or “This Is Why You Don’t Have to Chill It.” But I think it’s more important to mention control here, because the power is literally in your hands when you make this recipe, and I want to emphasize that.
You’re not going with a tube of pre-made crescent dough here, though that can be helpful to make a super easy apple dessert when time is not on your side!
Going all in and completely homemade will have its challenges, which I’m preparing you now for them.
The dough will seem very sticky and elastic when you first start to work with it, but you are free (as free as can be!) to add flour to get those stuck pieces off the parchment paper, to make the dough easier to manipulate, and to help you to create the perfect texture.
You’ll know when it’s just right because the dough will roll out easily without sticking uncontrollably to whatever surface you’re working on. It’s magical. You yield the power to make that happen, and a sprinkling of flour is your friend.
Secret #4: It’s OK If It Leaks in the Oven
Listen, this pastry dough is thin – that’s what makes it all flaky and buttery and delicious. The filling is wet, so you may have some leakage. And that’s totally fine.

We’re talking perfect strudel here as in perfectly delicious.
Will your homemade creations be picture perfect every time? Maybe not. Mine certainly weren’t.
But they were made with love, and trust me when I say that no one complained about a visible seam here or there, a slightly asymmetrical shape, or a little bit of leakage.
Use a rimmed baking sheet, and make a little parchment paper wall around the strudel if you want, rolling up the edges for a little extra protection.
Whatever happens, if you follow the recipe, it will still taste good. And practice makes perfect.
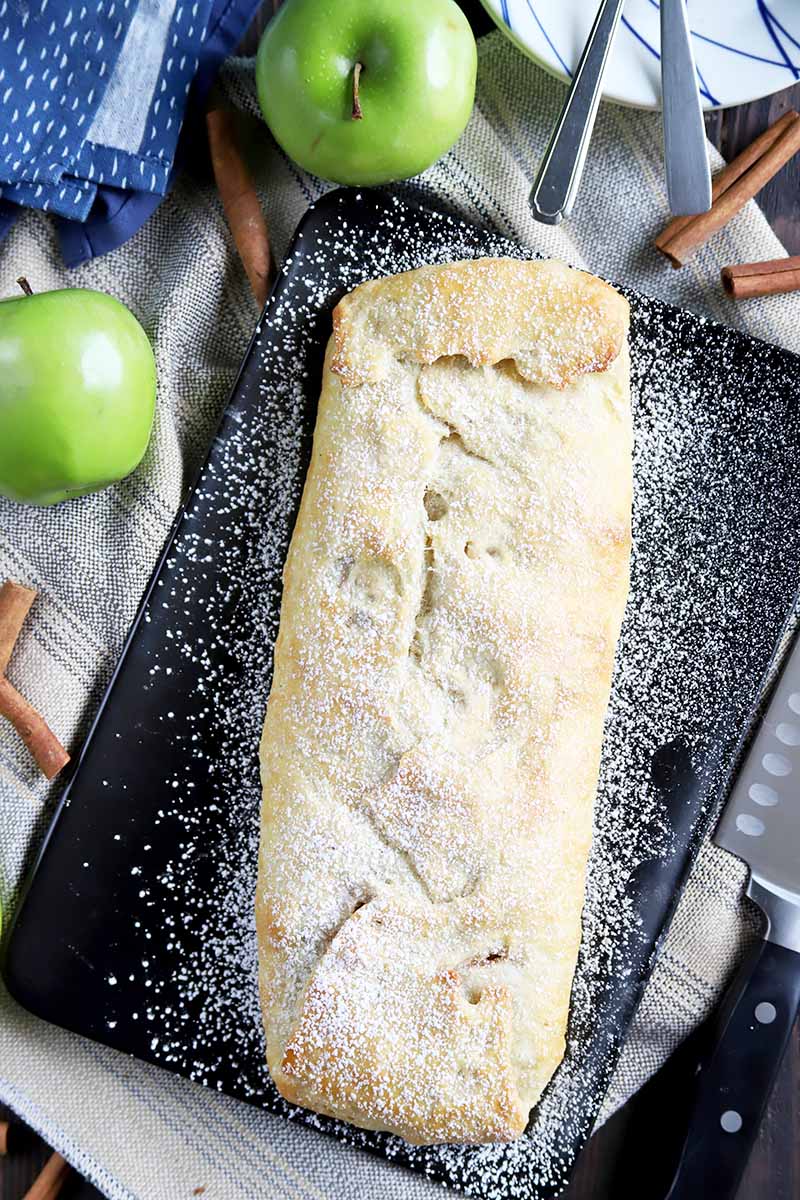
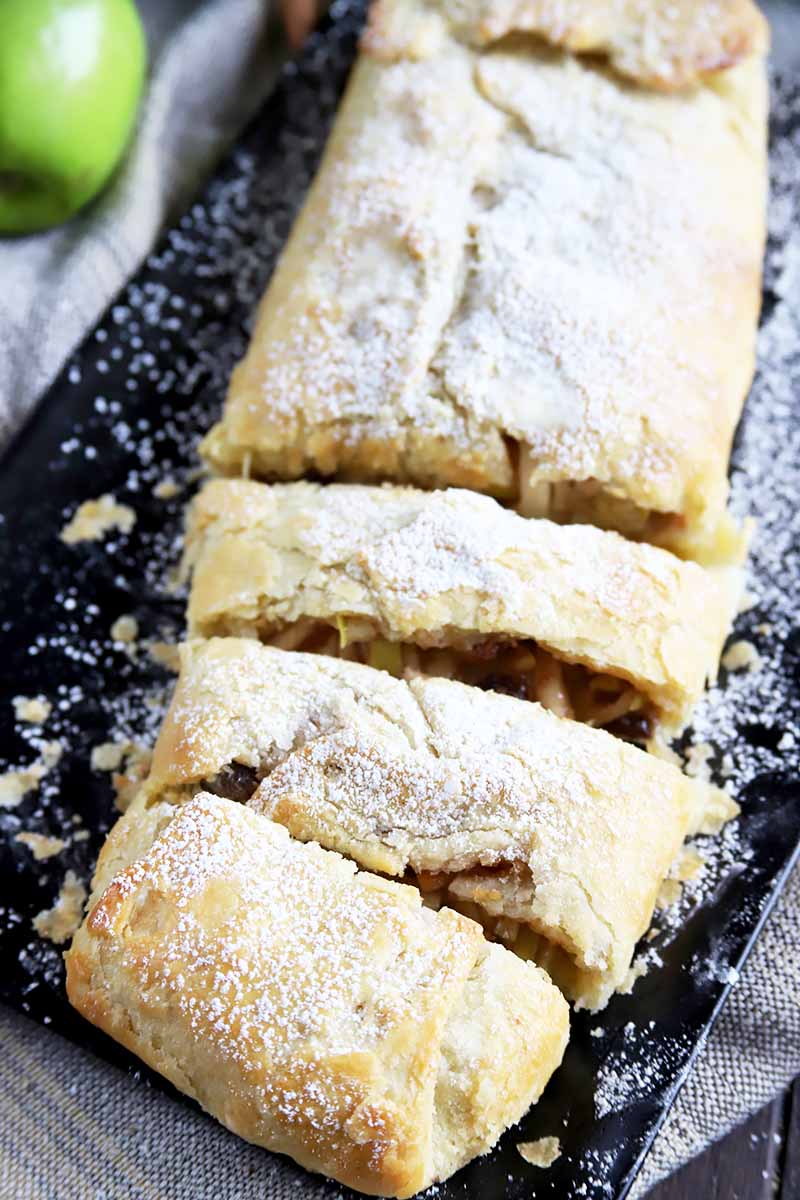
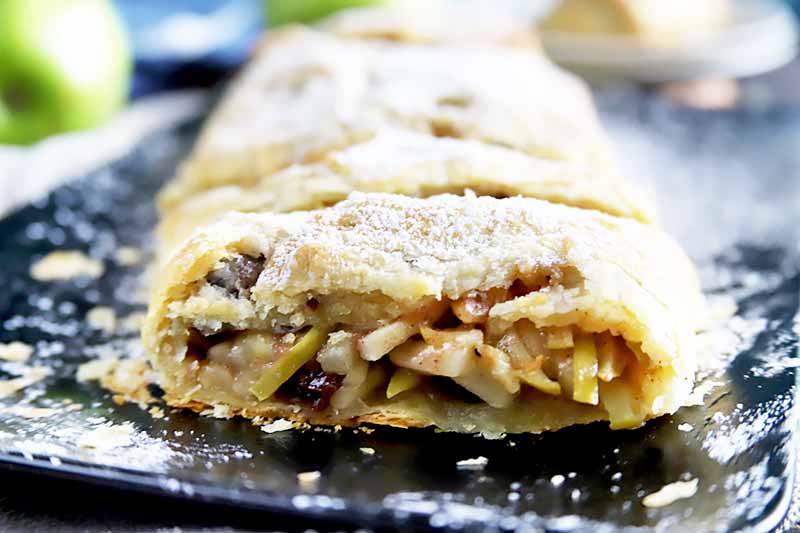
All these secrets would mean nothing if it weren’t for the results: a long, golden strudel with a flaky crust surrounding hot, apple-pie-like insides filled with nuts and raisins and gooey sweetness.
Have it with hot coffee! Top it with vanilla ice cream! Eat it on its own!
This is an apple strudel that you should be excited about. I know I am.
Print
The Perfect Apple Strudel
- Total Time: 4 hours, 50 minutes
- Yield: 5 servings 1x
Description
This just might be the perfect apple strudel recipe, and we guarantee that it’s a lot easier to make than you might think.
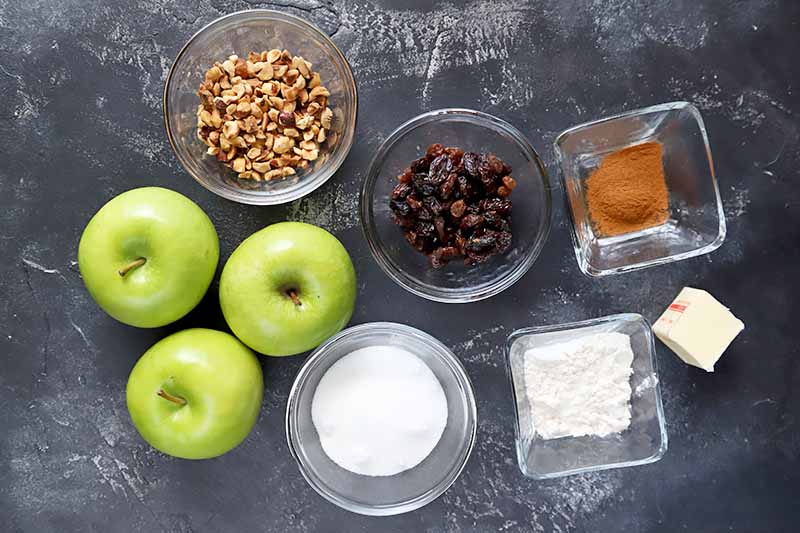
Ingredients
For the Pastry:
- 1/2 cup unsalted butter (1 stick)
- 1 cup all-purpose flour
- 1/2 teaspoon salt
- 1/4 cup cold water
- 1 large egg yolk
For the Filling:
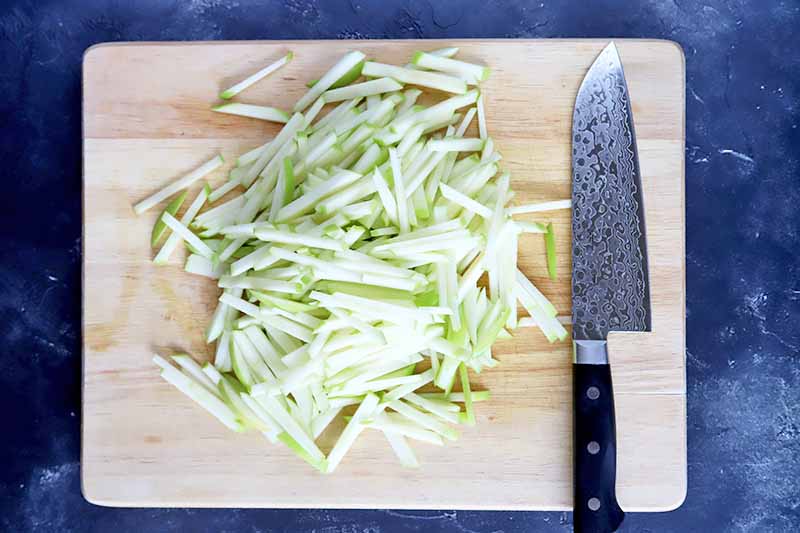
- 3 medium apples, thinly sliced into ¼-inch-thick matchsticks
- 2 1/2 tablespoons all-purpose flour
- 4–5 tablespoons granulated sugar
- 1/4 cup raisins
- 1/4 cup chopped roasted hazelnuts (or any nut you like)
- 1/2 teaspoon cinnamon
- 2–3 tablespoons unsalted butter, cubed
For the Egg Wash and Garnish:
- 2 tsp cold water
- 1 large egg
- Powdered sugar, for dusting
Instructions
To Make the Pastry:
- In a medium-sized bowl, stir together flour and salt. Cut butter into flour until the mixture is crumbly, not fine.
- In a separate bowl, whisk together 1/4 cup water and egg yolk. Add the wet ingredients to the flour mixture and stir to combine with a fork. Knead the dough right in the bowl for a couple seconds until smooth.
- Form the dough into a ball. If you wish, wrap in plastic wrap and refrigerate until ready to use. At least 4 hours is suggested when working in a hot kitchen, or up to 8 hours/overnight.
To Make the Filling:
- Combine all filling ingredients except the butter and powdered sugar in a bowl. Toss well to coat the apples.
- Filling can be made a day ahead and refrigerated until ready to use.
To Make the Strudel:
- Preheat oven to 400˚F.
- Set a piece of parchment paper that fits within a rimmed baking sheet on the counter and flour it lightly. Set dough on top, and flour it lightly. Place another piece of parchment on top of the dough.
- Roll the dough out as thinly as you can, sandwiched between the parchment, so it forms a rectangle longer in length than width, about 9 inches by 14 inches. If the dough is sticking, add flour. If it’s too cold to work with, let it sit on the counter for 15-30 minutes, until more pliable.
- Place the filling in a mound in a straight line along the length of your dough. This should be like a mountain with no peaks, all uniform, pressed together compactly, about 1 1/2 to 2 inches high (see picture above for a rough idea). Dot with butter on top.
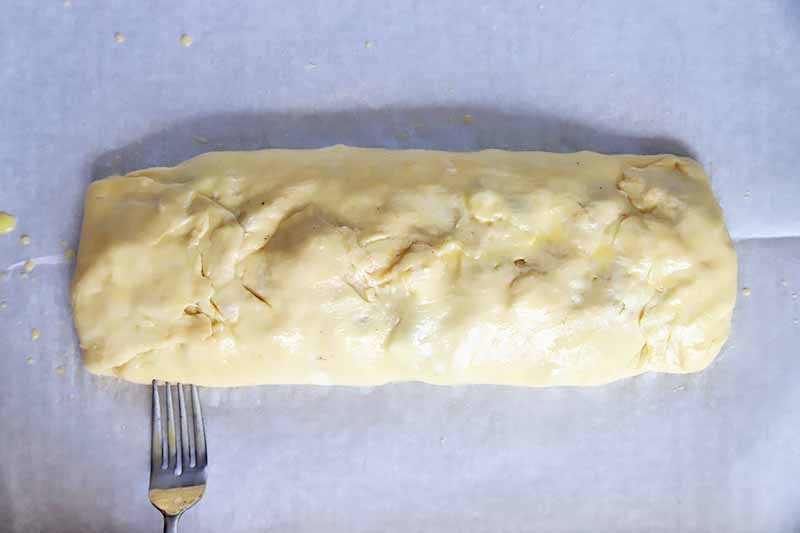
- Carefully roll parchment on sides up and over the filling, one side at a time, peeling parchment back from dough after you’ve set it. Then roll up the ends. Gently press together the seams.
- Transfer the dough with the bottom parchment to a rimmed baking sheet.
- In a small bowl, beat together 1 egg and 2 teaspoons cold water to make an egg wash. Brush all over the pastry. Use a fork to pierce air vents along the sides of the strudel. Bake for 30 minutes, until golden and fragrant.
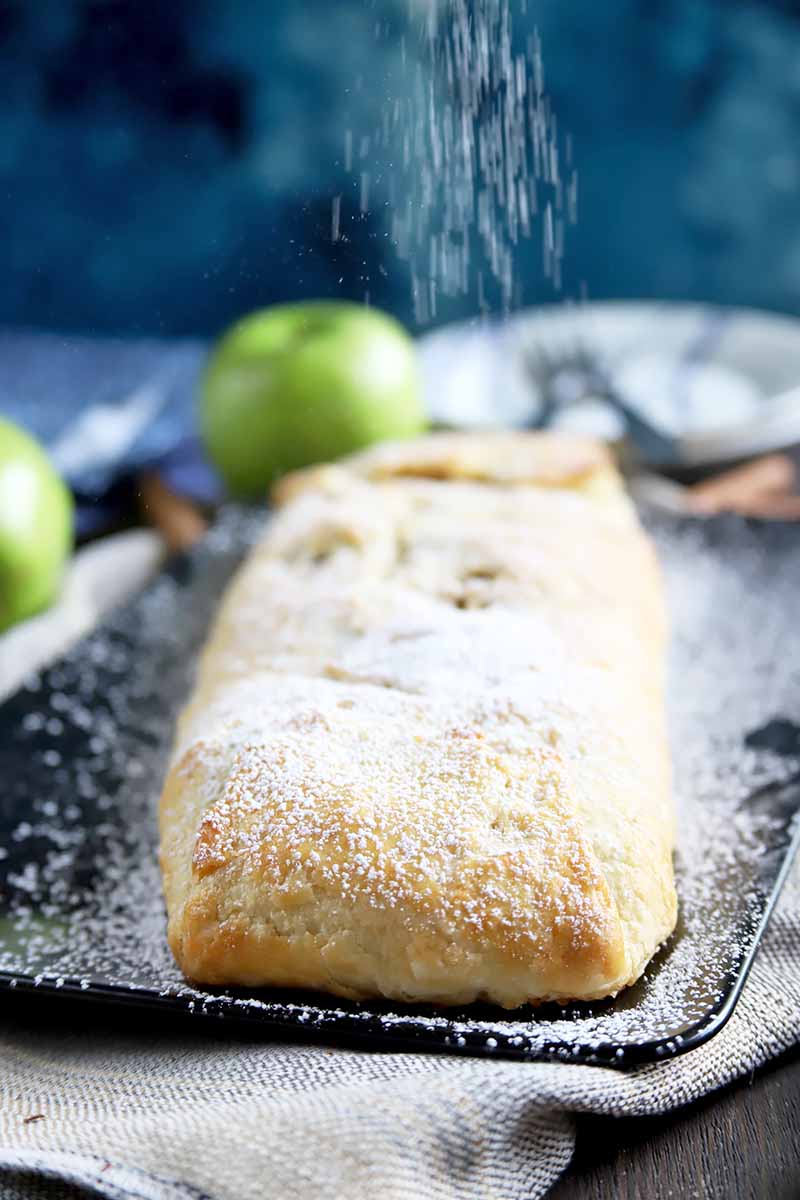
- Sprinkle with powdered sugar and serve warm.
- Prep Time: 20 minutes
- Cook Time: 30 minutes
- Category: Pastry
- Method: Baking
- Cuisine: Dessert
Keywords: apple, strudel, dessert, pastry
Cooking By the Numbers…
Step 1 – Prep and Measure Pastry Ingredients
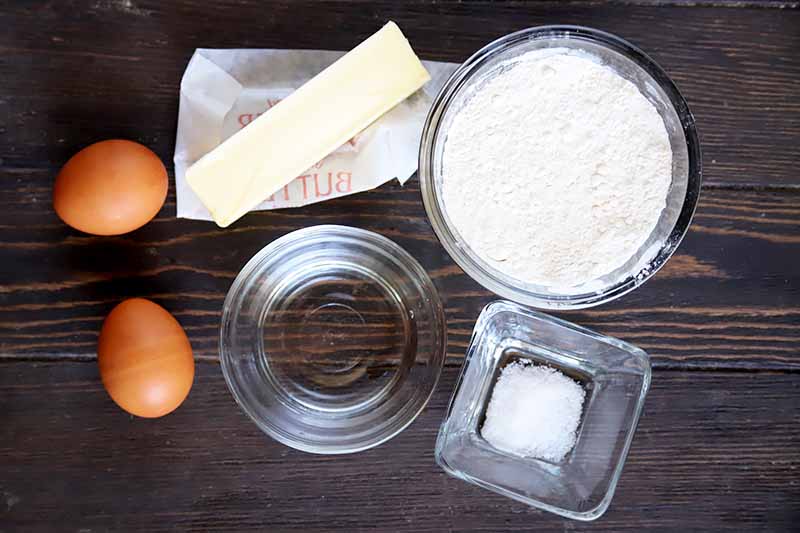
Separate the yolk from a large egg. You can reserve the white to make meringues or an omelet, or discard it.
Measure out all of the ingredients as listed on the ingredients list for the pastry.
Step 2 – Make Pastry
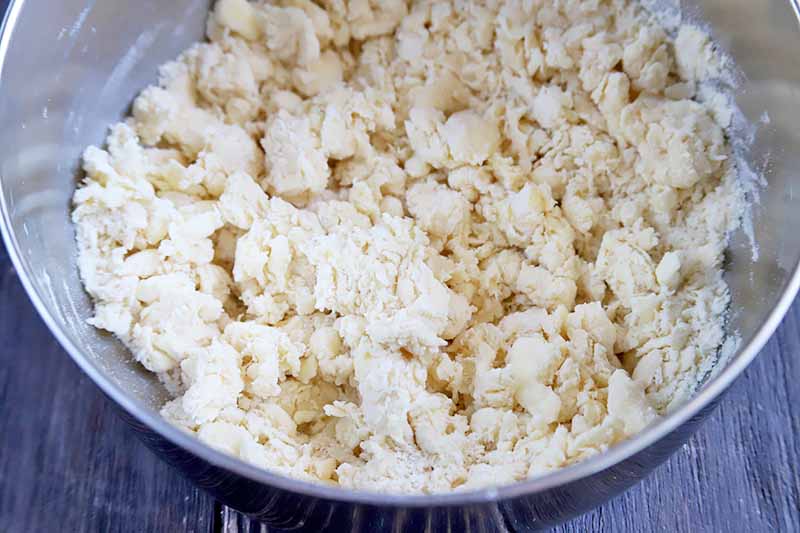
Add the flour and salt to a medium bowl. Stir to combine.
Add the butter for the pastry, cutting it into the flour until the mixture is crumbly with some pea-sized lumps.
In a separate bowl, whisk together the water and egg yolk. Add the egg mixture to the flour mixture and stir to combine.
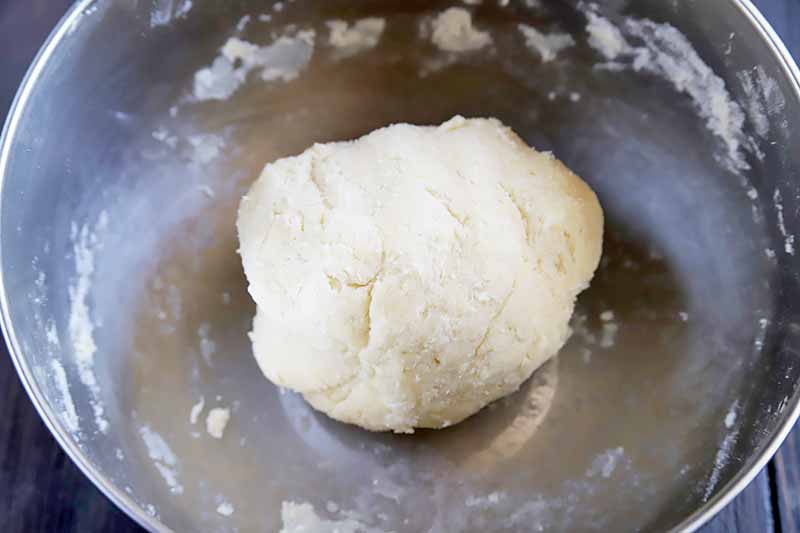
Use your hands to knead the dough in the bowl a few times, until it’s smooth. Form the dough into a ball.
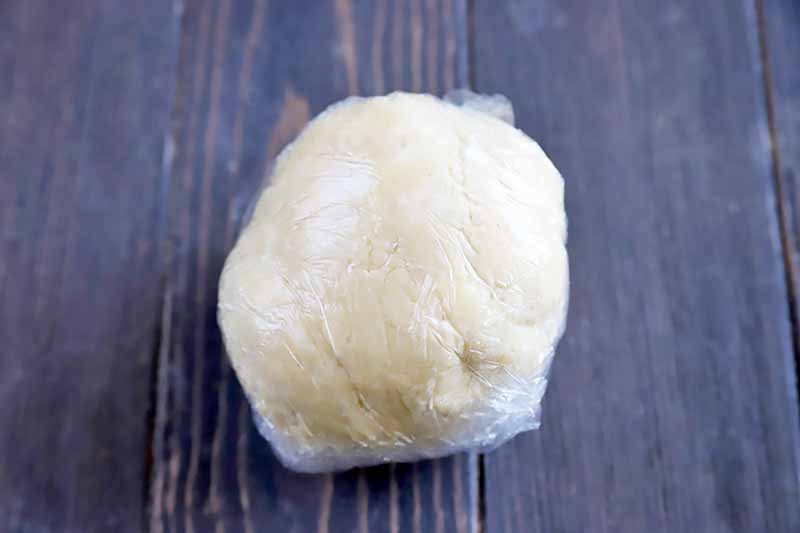
This isn’t what my mom does, or what I do, but if you don’t want to bake right away or if you’re a fan of giving butter pastry a chance to rest, wrap it tightly in plastic wrap. Place the dough ball in the refrigerator to chill for at least 4 hours, up to 8 hours or overnight.
Step 3 – Slice Apples, Chop Hazelnuts, Cube Butter, and Measure Remaining Filling Ingredients
Wash 3 apples and cut them into thinly sliced matchsticks, about 1/4 inch thick. You can leave the skin on for this, there’s really no need to peel the apples.
When selecting your apples, make sure that you review our guide to cooking with apples. Personally, I love using Granny Smiths for this recipe, but you can use other tart varieties as well.
Chop enough roasted hazelnuts until you have 1/4 cup total.
Cube the butter into small chunks.
Measure out all of the remaining ingredients as listed on the ingredients list for the filling.
Step 4 – Make Filling
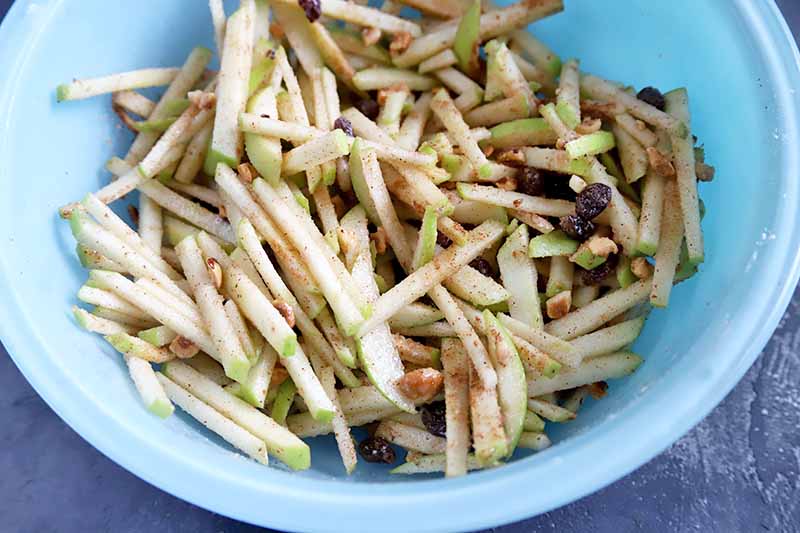
Add all of the filling ingredients except the butter to a medium bowl. Toss the ingredients together well until the fruit is coated evenly with the dry ingredients.
Note: the filling can be made a day ahead and refrigerated until you’re ready to use it.
When you’re ready to bake, preheat your oven to 400˚F.
Step 5 – Roll Out the Pastry
Place a piece of parchment paper that will fit inside a rimmed baking sheet on the counter. Flour it lightly, and set the dough on top.
Flour the top of the dough lightly, then place another parchment large piece of parchment paper on top.
Roll out the dough, rolling over the top layer of parchment paper. If the dough is sticking, simply add more flour.
If you’re using refrigerated dough and it isn’t rolling out easily, let it rest on the counter for about 15 to 30 minutes, until it’s more pliable.
As you work, remember that the bottom piece of parchment will go on the baking sheet while it’s in the oven. If it gets too messy or if it tears, you can start with a fresh one.
Roll out the dough until you create a thin rectangle about 9 inches wide by 14 inches long. It should be about 1/4 inch thick.
Add the apple filling in a straight line down the length of the dough, right in the middle.
Step 6 – Assemble Strudel
You will want to press it together and form it up high like a mountain, or more like a mesa or plateau that’s all uniform in height without a peak on top. Be sure to press it together well to compact the mixture. It will be about 1 1/2 to 2 inches in height.
Distribute the cubes of butter evenly over the top.
Carefully roll up the parchment on the sides, up and over the filling, working with one side at a time. Carefully peel back the parchment to remove it from the dough once you’ve set it.
Roll up the ends of the pastry and gently press together the seams to make sure they hold.
Transfer the strudel with the parchment paper on the bottom to a baking sheet.
Step 7 – Bake
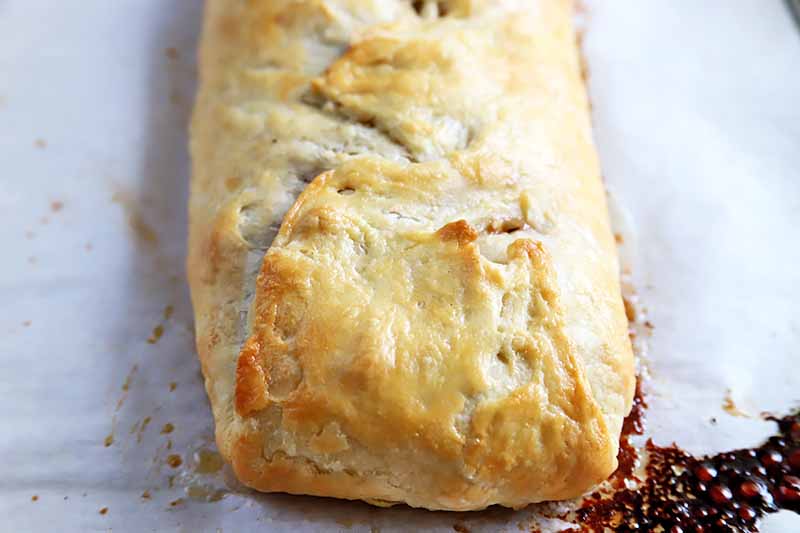
In a small bowl, whisk together 1 egg and 2 teaspoons of cold water. Brush the egg wash evenly on the top and sides of the pastry.
Use a fork to pierce the sides of the strudel. This will allow air to release during baking. Pierce it a handful of times on either side. I pierced mine about 5 times per side.
Place the pan in the oven and bake for 30 minutes, until the pastry is golden and fragrant.
Dust with powdered sugar and serve warm.
Can I Freeze Apple Strudel?
In my opinion, this apple strudel is absolute perfection on the same day that it is made. But it will keep for at least 1 to 2 days at room temperature.
If you do want to bake this pastry ahead of time and save it for later, allow it to cool completely first. You can freeze it after wrapping it tightly in plastic wrap, then a layer of heavy-duty aluminum foil.
To reheat, unwrap and bake at 350˚F until it’s crisp and warmed through, for about 15 minutes.
We all need more baked goodies in our lives, don’t we? Here are some more delightful dessert recipes made with apples to add to your baking list:
- Rustic Apple Tartlets
- Apple Pear Pie with Cardamom and Ginger
- French Apple Tart with Maple Syrup Glaze
What occasion will you bake an apple strudel for? Tell us in the comments below. And once you try the recipe, be sure to come back and rate it!
Photos by Meghan Yager, © Ask the Experts, LLC. ALL RIGHTS RESERVED. See our TOS for more details. Originally published on September 30, 2010. Last updated March 4, 2020. With additional writing and editing by Meghan Yager and Allison Sidhu.
Nutritional information derived from a database of known generic and branded foods and ingredients and was not compiled by a registered dietitian or submitted for lab testing. It should be viewed as an approximation.
About Shanna Mallon
Shanna Mallon is a freelance writer who holds an MA in writing from DePaul University. Her work has been featured in a variety of media outlets, including The Kitchn, Better Homes & Gardens, Taste of Home, Houzz.com, Foodista, Entrepreneur, and Ragan PR. In 2014, she co-authored The Einkorn Cookbook with her husband, Tim. Today, you can find her digging into food topics and celebrating the everyday grace of eating on her blog, Go Eat Your Bread with Joy. Shanna lives in Nashville, Tennessee, with Tim and their two small kids.


the super funny thing is i am eating an apple struedel poptart rightnow! LOL… yours looooks fantastic!! Im drooling!
this looks delicious! you reminded me I haven’t made strudel in AT LEAST 2 years! I usually make it with phyllo dough (the way the women in my family always have even after they left Austria). Have you ever had a poppyseed strudel? It’s my absolute favorite of the strudel family but I’ve learned mass quantities of poppy seeds are not always popular amongst those that aren’t accustomed to them.
I’ll have to get more apples and make a strudel soon! (where has september gone??)
yay! so glad you put those apples to good use (i knew you would!). and can you believe it — after shoving apple-filled baskets and brown paper bags into guests’ arms at the end of the night, we actually almost got rid of all of them. i knew food centerpieces would be a good idea. especially when this strudel is involved. 🙂
beautiful! apfelstrudel seems to be trending right now. and that’s a great thing! i posted about my first attempt the other day (http://squirrelbread.wordpress.com/2010/09/24/apfelstrudel-a-new-tradition/) — what an amazing process and end-result. though i envy that you worked from family recipes. in my (hopefully) many future attempts i’ll look into the differences between our two recipes, especially the butter pastry.
cheers,
*heather*
Is Secret #5 that the strudel tastes better when you use wedding apples? 🙂 I have a sneaky feeling that good karma makes for good dessert.
Looks wonderful….I was wondering where all the apples wound up. Glad someone is doing something with them!
well we were traveling in ireland and scotland for a month with limited internet access. i come home yesterday, to falling leaves and a chill in the air, and what do i find? THIS INCREDIBLE recipe for something i NEED to make, right now. thanks to you, your gramma, and also to your friend that gave you the glorious apples, for this inspiration!
Looks delicious! Not sure if it’s the same Maywood, but my grandpa grew up in Maywood, Ill. 🙂
Rachel, Ha!
Lisa, I would love to try a poppyseed strudel! I’ve never even heard of it before!
Jacqui, Definitely! Food centerpieces are a total win – beautiful and useful! Thanks again, friend!
Heather, Well at least you are making your own family recipe to pass on, right? : ) The pastry dough was the best part – I still can’t believe how well it ended up working!
Maddie, Ha! How did you know?
Anna, Well thank you for coming over here and commenting! We had a great time at the wedding – I could tell you and your family did, too. : ) Thanks for hosting us!
JessieV, Ireland and Scotland sound wonderful!
PostCollegeCook, The same one! She lived on Augusta – they built the first house there back a couple decades ago!
oh, strudels. I definitely need to try that out. do you find that the white spelt flour has the same texture and weight as regular flour in baking recipes?
This is soooooo good! And surprisingly easy to make! I thought the dough would be really hard to handle but it wasn’t at all! It’s such a cooperating willing dough! (Yeah, I’m excited, I can see why you were too!) The only thing I would add as a tip is to roll the dough out as an oval to make the edges a little bit thinner, because mine had so many layers at the ends that the middle ones were a little bit raw. But otherwise it’s sooooo yummy!
Nothing like a good family recipe. And appropriate timing as I’m reading your post while sitting at my kitchen counter waiting for the second round of pop-tart dough to chill….first round: utter failure. We shall see. But I love your tips. The more successful bakers I’ve been hanging out with lately are the ones that have more of a ‘it’ll be fine’ mentality whereas I tend to be an anxious baker. So I’m trying that hat on for a while. Happy weekend!
I liked it so much I baked a second one but filled it with pears and dark chocolate and it was even better than the apple one!
See, I think this post proves that you are destined to be a cook/chef/baker. You were given apples and immediately thought about what you’d make with them. I, on the other hand, go apple picking, come home with nearly 1/2 a bushel of apples, make all these plans to make stuff with them, and more times than not, end up just eating them before I get around to it. But this looks deeeeelicious! It’s nice that you can make good things GREAT.
Beautiful, Shannalee! It’s a special kind of satisfaction when you pull that just-right thing from the oven, isn’t it? (And I agree with Maddie, up there, that those special apples can only have helped matters.)
heather, Yes! That’s exactly right: white spelt flour has nearly identical taste/texture to all-purpose in baking.
Mariana, Oh, I’m so glad you liked it! And the chocolate/pear combo sounds awesome – I wish I could taste yours!
Megan, It honestly encourages me to know other people have cooking failures. I’ll tell you what my dad told me when I recounted attempts #1 and #2: you learn by trying! that’s the only way! : )
Alicia, Ha! Well, for the record, there’s nothing wrong with eating apples by themselves, and I definitely did that with at least two of our lot. Do you have any apples left? This strudel is just waiting….
Jess, Indeed! And no question: wedding apples make the recipe. : )
Lovely post! And that apple strudel looks amazing!
BTW, I totally love that plate in the last photo- antique?
ok ok just made this!!! waiting for it to come from the oven!!!
Kamran, Thank you! and good eye! It is antique indeed. : )
Rachel, Yay! I hope you guys love it!
that looks perfect alright! golden and crusty. yum!
This was absolutely delicious. I’ve been hesitant to make strudel in the past; one of my ex-boyfriends once took a strudel-making class in Vienna, where they instructed him to roll the pastry thin enough to be able to read a newspaper underneath. Completely intimidating! But you made it seem refreshingly doable, and lo and behold, I had a flaky, tasty apple treat last night without too much work. Thank you!
LimeCake, Thank you!
Abby, Yay! Thanks so much for coming back here to let me know! And I know, it can seem super intimidating with instructions like those (which are right, you do want the dough super thin!) but I’m so happy you conquered it! Flaky and tasty without too much work = awesome.
dynamite. I was a little intimidated but it turned out great. thanks for sharing the recipe and the good tips!
Man, I am loving the positive feedback. KC, thanks so much for letting me know!
Oh my goodness! This looks absolutely amazing, and I cannot wait to make something like this! Apple pie/strudel reminds me of my grandmother and the fall.
E.P. – Hope you get to try it soon!
Hi! This is Happy Jack’s sister. I made your apple strudel last weekend for our father’s birthday. It was delicious!!!! That pastry was so flaky and perfect! Do you have any pie crusts like that too?
I’m thinking about that strudel again as I write this–I seriously may need to make another just for me this weekend. Thanks so much for sharing it!
Jenny, I already feel like we’re friends! So glad you liked the strudel, and I wish I had a pie crust recipe to give you! Let’s you, me and Jacqui hang out soon. : )
It’s in the oven – had to make another batch of dough to plop on top to seal. Hopefully, it will still work out. This was the first time I ever attempted something like this, and the dough stuck like crazy. Guess I should’ve kneaded more flour in first. My boys want us to try it again next week. 🙂
Everyone LOVED it! Thanks!!
Oh, I’m so glad, Laura! If I can be of any help with questions about the dough, please email me through the contact page! I know sticky dough is tough — but I’m glad the results were still good! : )
It’s in the oven!!!
Yay! Hope you enjoy, Laura!
This would be perfect for my dad’s birthday coming up!
Oh, do it, Amy! This is still one of my favorites and THE recipe that opened up a world of pastry doughs.